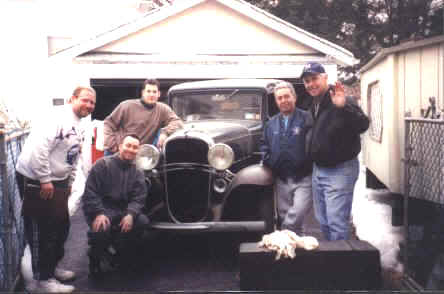
January 13,2001 - My third Olds arrived from a ten year storage in North Carolina.
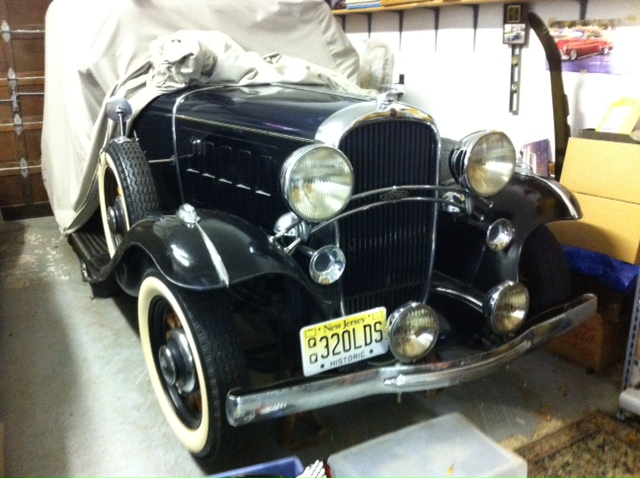
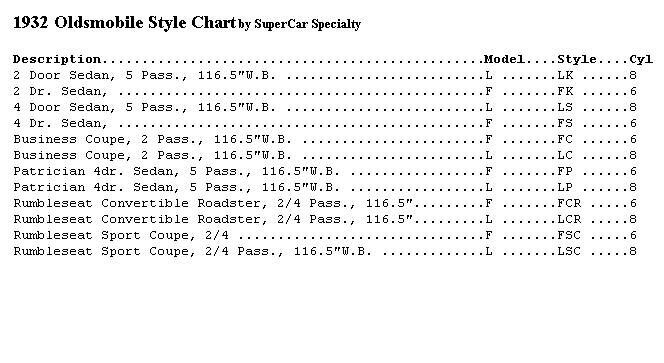
In 1932, Oldsmobile offered six models in six and eight cylinder versions. style chart color options This is a six cylinder Deluxe Four Door Sedan. standard specifications It is a dual side mounted model with artillery wheels which makes this car much more rare particularly in this condition. This beauty is in original condition with 41k miles on the odometer.
Dudley was the second owner for nearly forty years. His age and distance from the car forced him to put it up for sale. I promised him continued tender loving care.
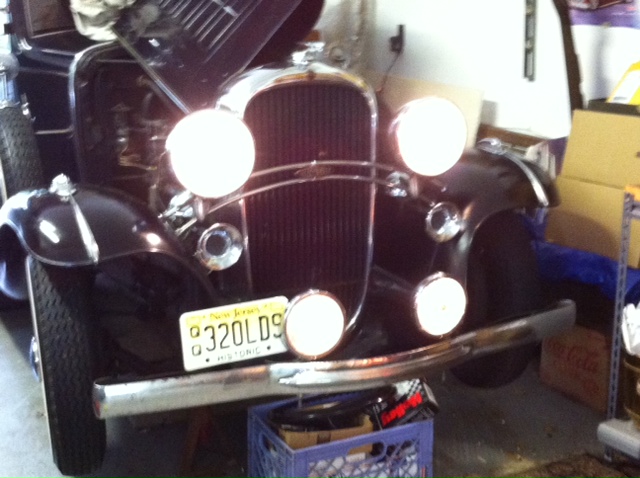
The engine seized from sitting so long. I have since freed the flat head and it purrs like a kitten. My plans right now are to clean her up and preserve it's unrestored originality. I'll take it to some shows and tours each year and in time start a frame off restoration.
Olds Ad Slogan for 1932. "Outstanding General Motors value in the medium priced field."
Brochures of model year features and accessories
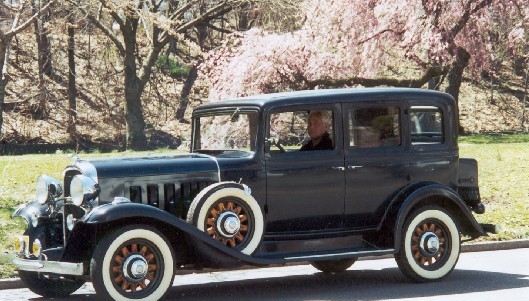
All Cleaned up and enjoying the Cherry Blossoms in the Spring of 2001
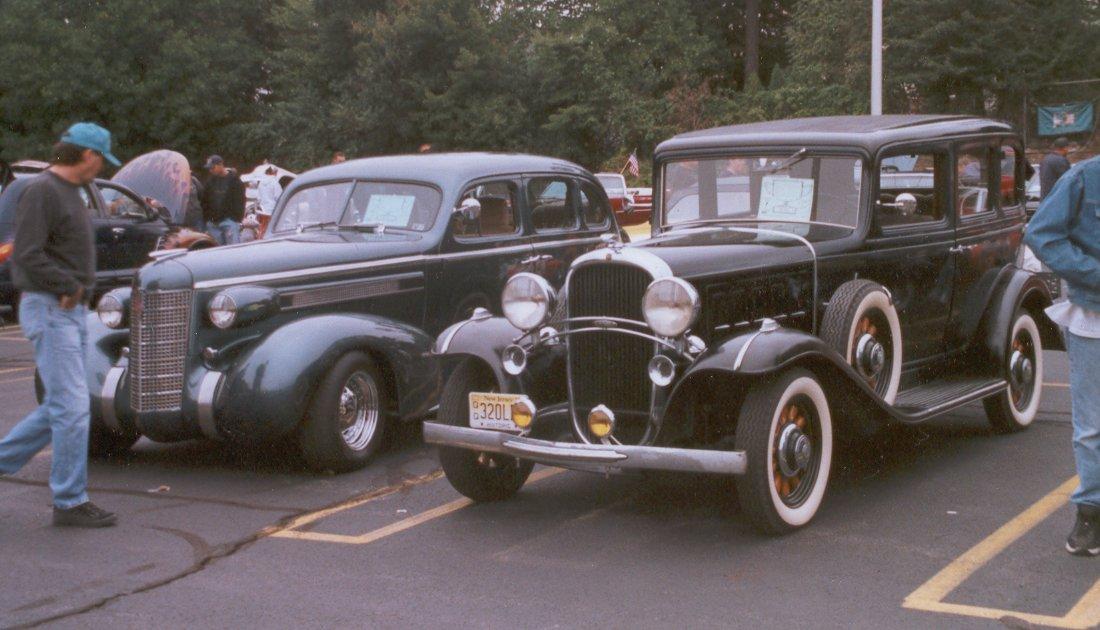
9/30/2001 Tri-County Annual Car Show in Wayne, NJ Safe at Home 11/02/03
5/28/15
It's present status. Woke it up from a long sleep.
It's Alive ! Hear and See it run.
3/4/17
The latest NOAC Monthly Journal ( Runabouts to Rockets ) featured a 1932 Coupe. What caught my eye immediately were the wheel trim rings and how they added just the right dressed look to the car. As a result, I purchased a set of aftermarket 17" trim rings and they fit perfectly. I had to buy another set to dress the side mounted wheels as well.
4/21/17
My maintenance and upgrade impulse has shifted to the '32. Some appearance improvements have been addressed:
Dress trim rings
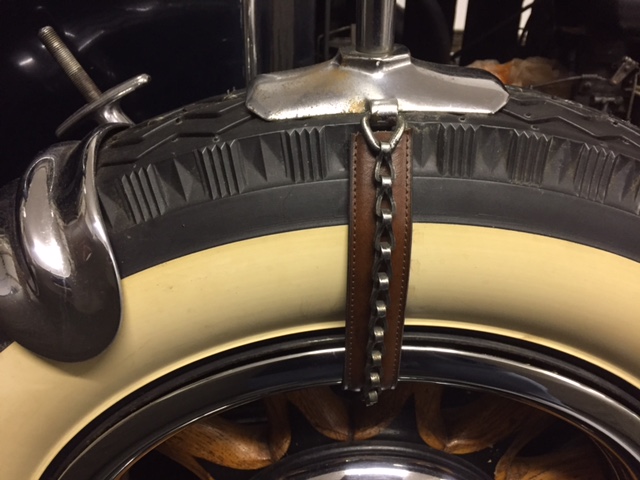
Leather straps for the side mount mirrors
As well I put in new spark plugs, period correct wires, points, condenser, rotor, cap, and coil and timed it as per specs.
This car doesn't get started or driven regularly. As a consequence, drain back of the gas and the emptying of the carburetor makes starting a drawn-out process to get it primed. I've decided to discretely mount an in-line electric fuel pump as an assist in starting. I will wire it through an on /off switch and turn it off once the car starts. The theory is that the electric fuel pump will add the needed pressure to more quickly prime the carburetor and therefore start sooner saving the starter motor and battery from unnecessary wear. Hope it works.
4/28/17 Installation of the electric pump went well even though I needed to make a bracket to allow the gas line to pass through an available opening. I tried to hide as much as possible. The test starting went well and the car started without having to prime the carburetor physically as well as using starter fluid to get it started. I was cautious and did not let the electric pump run for too long before cranking over the car. By the third try the car started. Knowing now that there were no leaks while it was pumping, I will attempt to start it tomorrow and allow the pump to run longer before cranking. Hopefully it will start sooner.
5/4/17 So problems occurred and it took some time to resolve. The next test of the two pump concept caused the mechanical to leak over the sump bowl and after much testing proved that the diaphragm was damaged as well.
Trying to run the car on the electric pump alone was a disaster. Too much pressure and the carb flooded over.
Luckily, the former owner ( Dudley) was a wise man and had accumulated many parts 'in the event of.' I have four pumps in various stages of disrepair. After two days of swapping parts I finally made one that works perfectly.
The final outcome is that the car is running very well with a freshly rebuild pump and carburetor. I will leave the electric pump installed in the event of an emergency but will need to install a low pressure regulator to decrease the pressure to the carb before attempting to use it.
5/14/17 My '37 is in the Transmission shop for repairs. I'm suffering from O.S.A. ( Oldsmobile Separation Anxiety). So, for therapy, I've been repairing and solving minor issues left unresolved for far too long on the '32. In so doing, I have spoken to some very knowledgeable fellow '32 owners and have learned a lot about the amazing engineering of these beautiful cars. Rush Wright in West Virginia, owner of two, explained and educated me as to the design, materials, and method of getting manifold vacuum to the windshield wiper - ingenious ! Unlike today, everything is thoughtfully designed for the owner to repair. With a handful of tools almost everything can be fixed.
I kept looking for some vacuum hose from the firewall to the intake manifold thinking that was the solution to the non- functioning of the wiper. Wrong! The vacuum is shared via copper tubing with the decarbonizer. ( That's a topic for another day). The copper tubing runs through the firewall, crosses to the driver side on the interior wall, and up the interior driver's side corner rail to the wiper motor. At that point, a short section of rubber tubing attaches to the wiper mechanism to supply the vacuum. Oldsmobile thought ahead and provided easy access to it without major disassembly of the interior. I'm impressed.
I was convinced that the vacuum wiper was beyond repair and needed to be replaced. I saw a You Tube video whereby a guy merely added some brake fluid into the unit via the suction port and continually moved the shaft to free up the internal paddles to loosen and lubricate the internal parts. I tried it and after reinstalling the unit to the car got minimal in one direction and then it stopped. I left it thinking I would get to it in the future. I started the car today and for kicks tried the wiper motor. I was floored to see the wiper blade operating as designed. Swish, swish, swish. Go figure !! Never underestimate the genius of Back Yard Mechanics.
1/25/18 Since my last entry two other issues have been resolved.
The Dome Light - After removing the glass dome and base unit I found faulty aged wiring. I replaced a section of frayed positive wire and a bad ground. Light now works as it should.
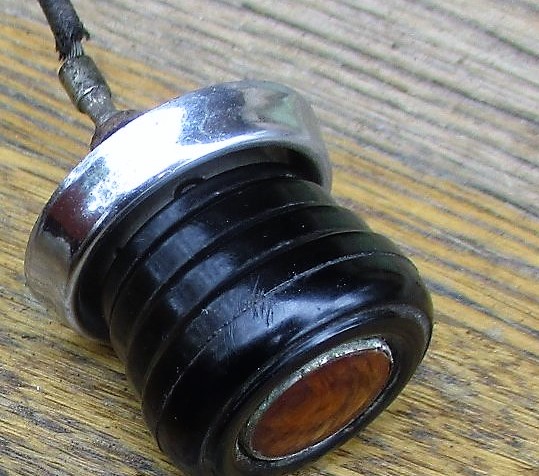
The Cigar Lighter - The motivation to tackle this issue came from a fellow '32 owner. ( later explained.) At first I did not know what this was on the dash.
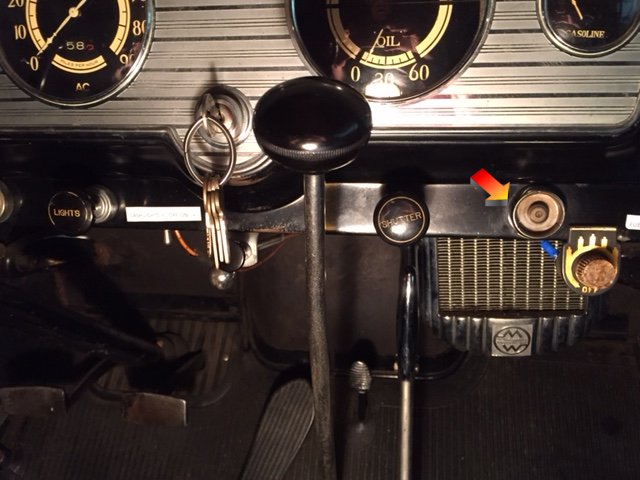
After questioning men more knowledgeable than I on the AACA Forum, I was lifted from ignorance. In 1932, Oldsmobile's Cigar lighters were surface flush mount units rather than the in dash 'well style' that I grew up knowing as the design for all lighters. The problem was that the original cigar lighter ( the white cat's eye knob part ( see below) ) is nowhere to be had. The best I could do was to find a complete unit from the era. The noticeable difference is the color of the cat's eye. A little paint can fix that. In any event, it cost a pretty penny. I guess one can say all of them no mater what make or model are pretty rare.
Example of an Original '32 unit The Replacement
It's installed and wired but not working yet. I'm not lighting any cigars anytime soon so when I've got nothing else to do I may find out why it's not yet working.
The most recent improvement for 2018 is to the Automatic Choke.
A fellow '32 owner, Ted in MA., is doing a total restoration of a 6 wheeled convertible roadster. He reached out to other owners a couple of months ago asking for any info on the cigar lighter base. He has the proper lighter but at the time not the base unit. I sold the base I had to him so that his car could be one step closer to O.E.M. That's how my cigar lighter replacement came about. Ted is logging his restoration progress on the Forum and his workmanship is amazing. His finished product will be a 100 point car.
What got me working on the Automatic Choke was the result of viewing and reading Ted's photos and log. I have a complete undisturbed unit but it was not attached and an aftermarket manual choke was installed at some time.
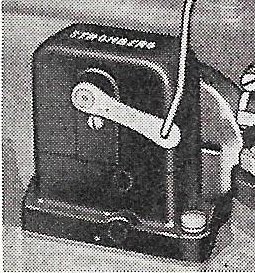
It is described as a Divorced Automatic Choke. Modern units are attached to the side of the carb. These were mounted to the intake manifold with the thermostat spring closely exposed to the exhaust manifold. The heat from the exhaust manifold causes the thermostat spring to expand therefore moving the arm attached to the carb butterfly and as a result controlling the amount of choke.
I removed the choke for cleaning and inspection. All was in order but for the bushing/nipple that is attached to the casing of the unit to securely lock the thermostat spring cover/enclosure to the unit.
exposed diagram view from above
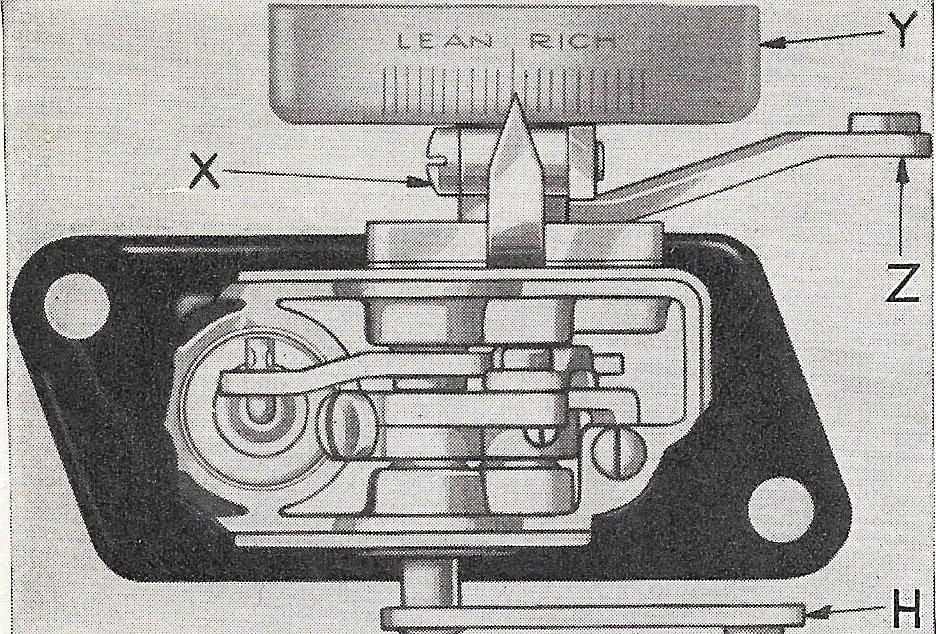
Y - - The thermostat enclosure / cover X - - clamp that secures the cover to the nipple as well as to allow for adjustment
The nipple was made of pot medal and was totally destroyed. My solution used the light fixture hardware that comes with every purchase of a new hanging light.
The diameter of the nipple is the exact diameter needed for the hole on the back side of the thermostat housing.
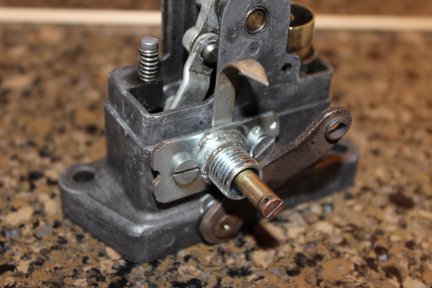
Ted is making me the connecting rod to the carb and I should be good to go.
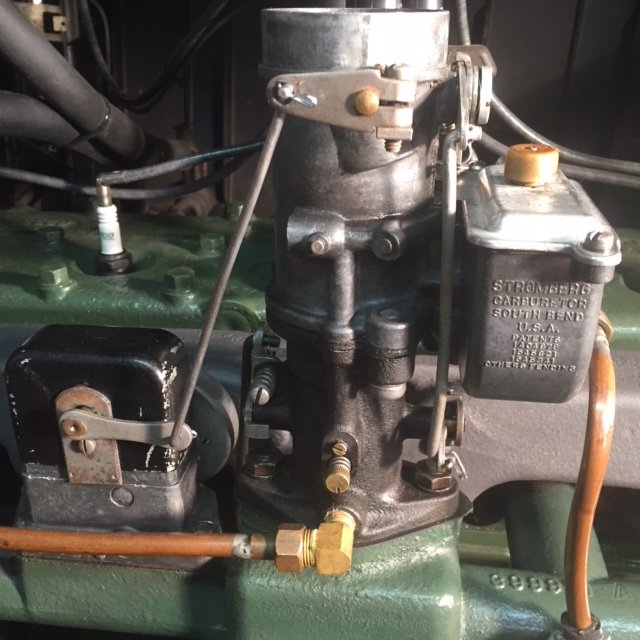
Gone is the aftermarket manual choke cable.
2/12/18 The Decarbonizer.
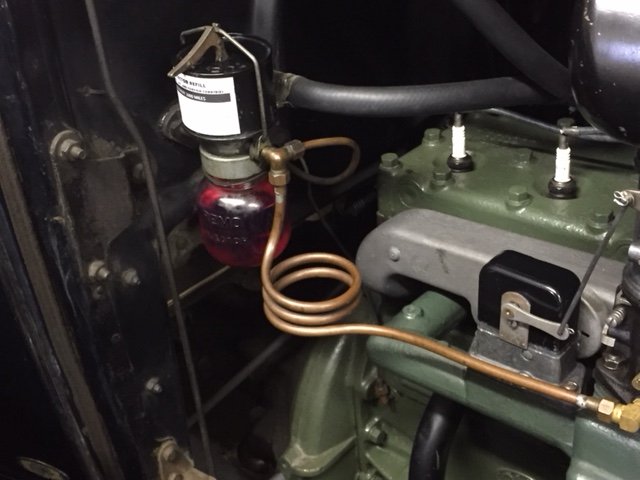
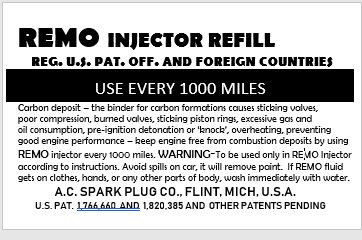
Not sure if this was a standard feature or an optional upgrade for the Deluxe models. I do know that there was a version in those days that could be bought and installed by the owner as well. The concept was simple. To control the carbon build up it was recommended that this REMO oil be introduced into the engine to keep things clean and carbon free. The copper tubing pictured attaches to the intake manifold. On the interior passenger side floor is a spring loaded foot button that allows the engine vacuum to suck in the oil. The service manual instructs to use it upon shut down and allow the oil to sit within the engine overnight. Upon the next start up expect to see a lot of smoke from the exhaust. I'm assuming that REMO oil is much like today's Marvel Mystery Oil. That's what I'm using.
I recreated the can sticker from photos of the original.
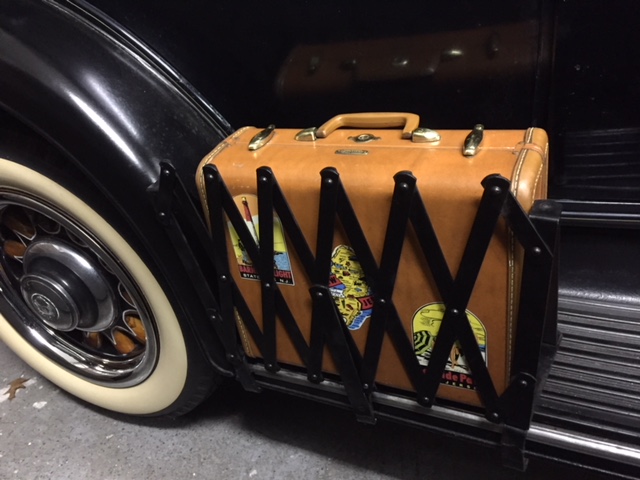
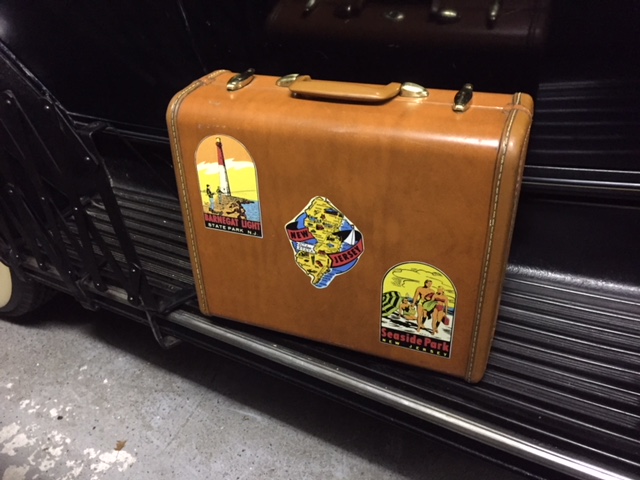
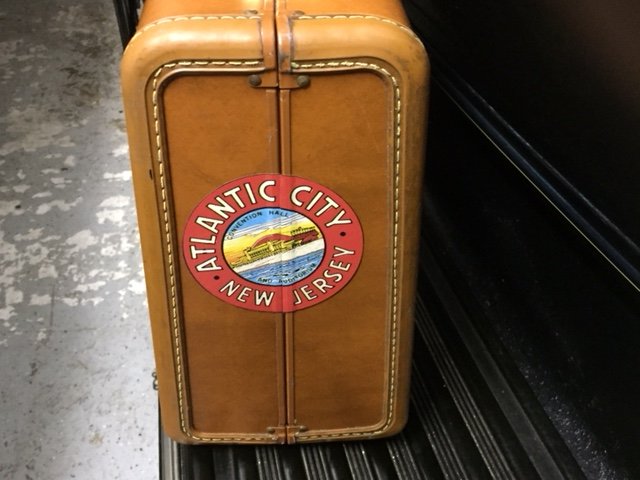
3/2/18 One of the accessories that came with the car is a running board 'clamp on' expandable luggage holder. I finally got around to making it work with the car. The C clamps were not wide enough to go over the lip of the running board. I bought a 1/4" X 1" steel bar, did some cutting, welding, grinding, and painting to solve the problem. I bought a vintage Samsonite suitcase and decorated it with New Jersey travel stickers. The look is great !!
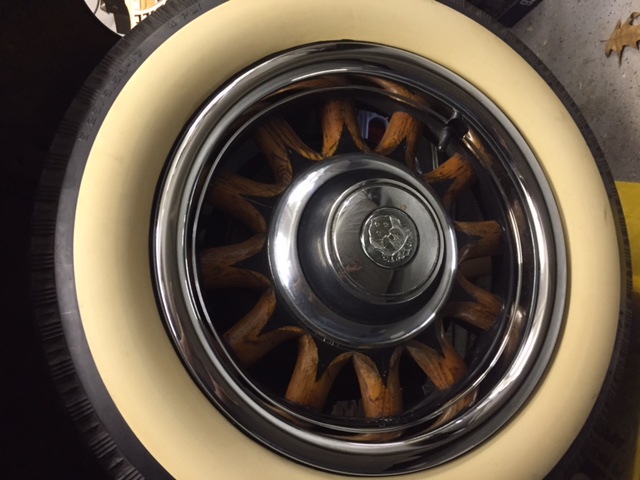
Another long overlooked and neglected 'to do' has been the wooden
wheels. After seeing restored cars, I needed to clean, pinstripe, and
varnish them.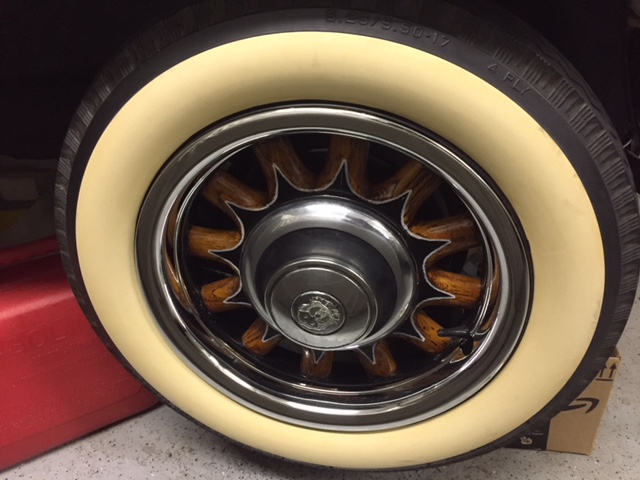
then now
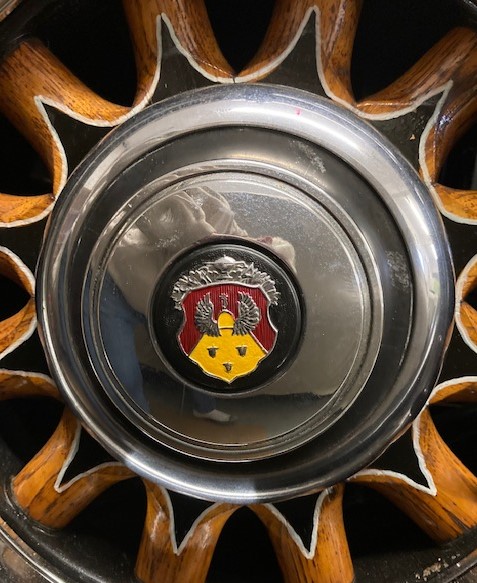
I often wondered why the hupcaps were not painted as is the radiator badge. As well why the Division would not want to stay in step with the competition
who all seemed to add this subtle "bling". So, I did it for them!
Can't wait to get it out this Spring and show it off.